Category: Technical
When it comes to double wishbone conversions on existing race vehicles or new builds the upright is often thought to be one of the more difficult elements. Without options on the market builders have often had to turn towards factory uprights, or aftermarket options that are less than suitable.
Brypar’s universal uprights can be tailored to suit your vehicle. We will adjust the design of the uprights to suit your suspension and steering pickup points as well as brake caliper you are planning to use.
Both our multi-piece and monobloc upright can have the steering position at any point on the upright, as long as it’s not on the same side as the brake caliper. The uprights feature an upper clevis for mounting the upper wishbone and/or the steering pickup. This makes camber adjustment simple and straight forward via the use of shims. All major pickup points are in double shear for added strength, stiffness and reliability.
There are pros and cons to each type of universal upright.
Monobloc
Pros: Light weight. More cost effective to manufacture. Less maintenance
Cons: Design and layout is fixed, so upgrading or using the same upright on both axles can be tricky. Uprights are handed.
Multi-Piece
Pros: Same core upright can be used on all four corners. Easily replace parts when upgrading brakes. Less spares to carry.
Cons: Slightly heavier than the monobloc. More expensive to manufacture multiple parts.
All Brypar uprights are manufactured using high quality materials and components. Get in touch with us today and find out how Brypar universal uprights will transform your race car.
We get asked all the time about groove patterns and what benefit they have to a motorsport brake disc. Brypar allow the complete customisation of disc, including the type of disc groove and the count. This way we can help tailor a disc to suit a particular vehicle, driving style or event.
Brypar offer six distinct groove patterns, all of which can be modified in count to offer specific characteristics.
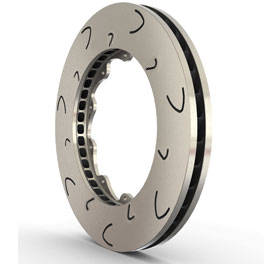
Plain discs
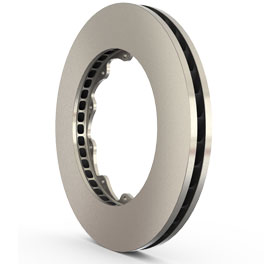
Plain discs use the exact same castings and are machined the same way as all Brypar motorsport discs. A plain disc is usually chosen for a vehicle where grooves are specifically forbidden by the rules (historic), or in certain applications such as long distance races where standard ABS systems tend to generate a lot of heat in the disc face. Disc grooving generates more localised heat in the disc surface.
Straight groove
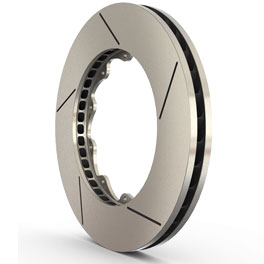
A straight groove is the most basic groove type and is often chosen to replicate an existing disc, such as those used in historic racing, or where a particular pad compound dictates a simple pad wiping feature. Straight grooves can affect NVH more than shaped grooves. If more than 8 straight grooves are required to initiate more bite we recommend looking at a curved or Konic groove which can be a more cost effective option. We offer this configuration with 5 x Straight grooves although this can be tailored to achieve different outcomes.
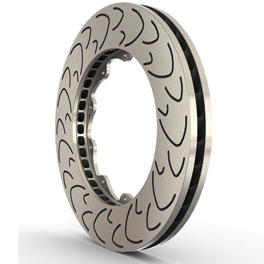
Curved groove
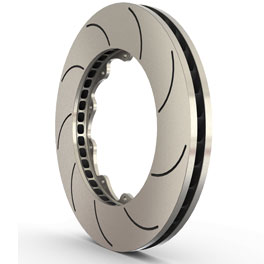
By increasing the length of a groove over the annulus of the disc you are increasing the wiping capability of the disc. While this will increase bite, surface temperature will also increase slightly. A curved groove can also help with evacuating the buildup of pad deposit and gases along the length of the groove. Brypar curved grooves help evacuate hot gases and dust through centrifugal force. We offer this configuration with 9 x Curved grooves although this can be tailored to achieve different outcomes.
Konic groove
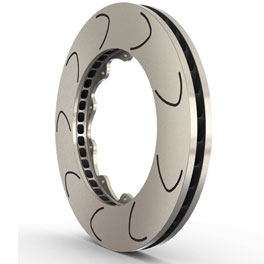
The Konic groove’s origins lie in the mathematically driven conic curve. While not strictly a conic Brypar’s Konic has been simulated using CFD and FEA to ensure it’s shape is optimised for maximum dust evacuation, bite and longevity. The single large Konic is suited to longer distance racing where bite and disc life are prerequisites however pad compound choice is important with softer pads often leaving deposits behind after hard use. We offer this configuration with 9 x Konic grooves as standard although this can be tailored to achieve different outcomes.
Konic² groove
The Konic² groove uses 2 smaller Konic grooves offset over the disc annulus to provide increased bite. This groove configuration works well with a wide range of motorsport pads and racing types, from sprints to endurance racing. Pad and disc life are moderate, although highly dependent on pad compound and general use. This is the go-to groove for most motorsport applications. We offer this configuration with 7 x Konic² (14 grooves in total) although this can be tailored to achieve different outcomes.
Konic³ groove
Using a combination of the 3 different Konic grooves the Konic³ is the most aggressive disc groove option available. We would only recommend this groove for qualifying, time attack, or where maximum bite and heat generation are required. The number of grooves can be tailored however we offer this option as standard with 7 x Konic³ grooves (21 in total)
Measuring up an existing motorsport disc can be tricky, however with the right basic tools it’s really quite straight forward.
Before you disassemble your disc it’s important you have the right tools and bench space available. You will need a bench top that is flat, a tape measure and digital vernier calipers. These are available online or at any hardware store. We use digital verniers as they give a more accurate reading, however the diameter of the disc can be measured using a tape measure as most discs are either in inches or whole millimeters.
When measuring up a used disc it’s important to be wary of existing disc wear. A disc measured at 32mm may in fact have been 34mm to start with. Be on the lookout for tell tale signs such as lips on the inner and outer edges of the disc.
Measuring a factory disc
Factory discs tend to be single piece designs making measurement straight forward. Follow these steps:
- Once the disc is removed from the vehicle start by measuring details of the hub, including the hub diameter, wheel PCD and fixing PCD. The wheel PCD refers to the stud pattern of the wheels. The fixing PCD refers to the fixing of the brake disc to the hub. Some vehicles will not have any fixing PCD so can be ignored. It is advised to photograph the factory brake setup fully assembled as well as photos of the hub and disc separately to ensure correct fitment.
- Once the disc has been removed, place it on your work bench and ensure that the disc can sit flat and true. Ensure all surfaces are clean and free from contaminants. Measure all key dimensions and make notes of any detail that may be required for manufacturing. The fixing type will usually be a counter bore or countersunk hole. Please ensure detailed measurements are given for these areas.
- Measure the overall diameter of the disc as well as the disc thickness and overall height. Flip the disc over and measure the overall height in multiple spots to ensure accuracy.
- Flange thickness, disc thickness and overall height allows us to model bells with the correct offset so it’s important that these measurements are given with 0.1mm accuracy. Please note disc wear can be a factor.
- Vane count and air gap are not critical as we will help you choose the right air gap and vane count for your application.
- If the disc has any usual feature make a note of them. The more detail that is provided the better.
Measuring a flat disc
A motorsport flat disc can have many more fine details than a factory disc so it’s important that accurate measurements are taken.
- Once the disc has been removed, place it on your work bench and ensure that the disc can sit flat and true. Ensure all surfaces are clean and free from contaminants.
- All key measurements other than OD should be measured using vernier calipers.
- Where the PCD fixing is a floating arrangement please add key dimensions of these in the notes. There can be various types of floating arrangements so it’s important that these measurements are correct. Photos of the disc to accompany the form will allow to us to contact you with any questions.
- Some flat discs have an internal or external step to the PCD fixing. These are usually somewhere between 0.25 and 2mm. Please provide photographs as well as measurement.
- Measuring the PCD of the disc is straight forward. Using your vernier calipers measure from the outer edge of one hole to the outer edge of the opposite hole. Then measure the diameter of the fixing hole. Take the first measurment and minus the second measurement. For example if the first measurement across you take is 212.4mm and your hole diameter is 6.4mm, then your PCD is 212.4-6.4 = 206.0mm
Measuring an existing bell
Measuring a bell is straight forward and uses a combination of the measurements taken above. Where it can get tricky is if the bell is a floating bell. The main tip here is to measure the PCD of the disc that the bell came off (see point 5 in measuring a flat disc). Details of your bobbin will also be required. Using the factory disc tips listed above as a guide, and providing photos will ensure bell manufacture is spot on first go.
Australian Rally Championship competitor Chris Higgs approached Brypar regarding a new project for the Australian Rally Championship, a Volkswagen Polo designed and built to AP4 specification. The AP4 class is loosely based on the FIA R5 class with all vehicles to be based on production counterparts using as many production components as possible, including production sourced 4WD drive train. The beauty of the formula is that there are so many different make and model of vehicle that can be homologated, proof of which is in the number of new for 2018 AP4 rally cars being built.
Brypar was to play an important role in the design process as well as undertaking the manufacture of major suspension and braking components. CAMS regulations for AP4 rally cars dictate that all 4 corners use the same uprights. This allows teams to carry less spares and also helps to cut build and maintenance costs, something that is key to seeing more competitors in the ARC. Each upright will be CNC machined from solid billet aerospace specification aluminium and feature bolt-on damper legs and a unique double shear lower control arm pickup that can easily be changed to a single shear pickup when required. To keep on top of costs and with easy maintenance in mind factory bolt-in wheel bearings and wheel speed sensors are used, which in turn house factory CVs.
While costs have been kept under control design has not been compromised. Brypar have developed uprights that are strong, light weight, cost effective and highly adjustable and configurable. What more could you want?